Amplaya (Bitter Melon) Stuffed with Pork

Tags

, , , , , , , , ,

Ampalaya, also known as bitter melon, is a green gourd vegetable with a distinctively bitter flavor. It’s a staple ingredient in many Filipino dishes, often cooked in a stir-fry with shrimps and egg, or as one in a medley of vegetables in pinakbet.

I am not put off by the bitterness of ampalaya, I find it bracing and particularly like how it cuts through the unctiousness of grilled meat or fatty dishes. This dish is steamed quickly to preserve the green of the bitter melon and keep the minced pork moist and savory. When stuffing the bitter melon sections with the pork mix, pack it firmly but make sure not to overfill. I like to pour the juices that come out from the cooking process over the amplaya, making this a comfort meal on its own or one that will pair well with steamed rice.

Ingredients:
1 large bitter gourd (ampalaya), cored and cut into 1 1/2-inch sections
500 grams ground pork
1 onion, finely chopped
3 cloves garlic, finely chopped
1 small carrot, finely diced
1 stalk spring onion, chopped
1 egg
1 tbsp cornstarch
1 teaspoon light soy sauce
salt and freshly ground black pepper, to taste

For garnish:
finely sliced red pepper
cilantro leaves

How to:
Wash the amplaya and slice into 1 1/2-inch sections. Using a spoon, scrape out and discard all the seeds. This leaves you with an empty center into which to stuff the pork mixture. Rinse the ampalaya sections thoroughly and soak in cold water with some salt. After 5 minutes or so, drain and set aside.

In a bowl, mix together the ground pork, onion, garlic, carrots, and spring onions. Break in the egg, add in the cornstarch, and mix well. Season with the light soy sauce, then salt and pepper to taste. Stuff this mixture into the ampalaya sections, making sure to fill the top into a rounded shape.

Place the stuffed ampalaya into a shallow bowl that fits into a saucepan. Fill the saucepan with water enough to reach halfway up the side of the shallow bowl. Cover tightly with a lid and let steam over medium heat until the pork has lost its pinkness and the amplaya is cooked, about 10 minutes.

Transfer amplaya into a serving dish and pour over the liquid that’s in the bowl. Add sliced red pepper and cilantro leaves for garnish. You can also drizzle some sesame oil on top for flavor and shine.

Asian-style Eggplant and Oyster Mushrooms

Tags

, , , , , ,


Ingredients:

2 medium Asian eggplants (halved lengthwise, then sliced into 2-inch pieces)
salt and freshly ground black pepper, to taste
sesame oil
250 grams lean ground pork
3 large garlic cloves, chopped
1 Tbsp good quality soy sauce
1 cup oyster mushrooms, shredded
1 small onion, finely sliced
2 stalks scallions (white part chopped, green leaves sliced on the diagonal)
a pinch of red chili flakes
1/2 cup water or pork broth
1 red chili, sliced finely on the diagonal
small bunch of flat-leaf parsley, chopped
cooking oil, as needed

Heat up a non-stick pan, on medium heat. Season eggplants with salt and fresh cracked black pepper, then drizzle with a little sesame oil. Toss to coat evenly. Fry up the eggplant in the heated pan just until the cut sides have browned. Remove from heat and transfer to a plate.

In the same pan, stir-fry the ground pork on medium-high heat until just browned. Add in chopped garlic and stir to mix with the pork. Season with a little salt and pepper, then add soy sauce. Stir in the shredded mushrooms, onions, and white part of the scallions. Add a little cooking oil if the mixture is too dry. Stir-fry to cook the mushrooms, about 1-2 minutes. Add in a pinch of red chili flakes.

Put back the fried eggplants into the pan and toss until well incorporated. Pour in 1/2 cup water or broth and let simmer for a minute. Add in the sliced chilies. Remove from heat and sprinkle with chopped parsley, tossing again to mix well.

Plate up and drizzle with some more sesame oil if desired.

Creamy Mushroom Chicken

Tags

, , , ,

Creamy mushroom chicken.

We’ve finally outgrown the every day fried chicken staple, what a relief! My boys have developed a palate for a variety of dishes. They now love a good grill, appreciate my experiments with savory sauces, and have even grown to like the flavor of the many spices I’ve picked up on my travels.

This chicken recipe is a variation on butter chicken, the flavor profile is creamy, garlicky, and earthy with the shitake mushrooms. Chicken thighs are perfect in this recipe – they are firm and juicy and do not dry out like white meat tends to do. I brine the chicken pieces for an hour in salted cold water, but if you’re on a time crunch, you can skip the brining part.

We are a household of 5 with two teenage boys, so 8 chicken pieces are just about right.

Ingredients:

8 bone-in, skin-on chicken thighs
salt and freshly ground black pepper, to taste
8 cloves garlic, smashed flat
1 Tbsp. butter
1 Tbsp. olive oil

For the creamy mushroom sauce:
1 Tbsp. melted butter
1 cup sliced dried shitake mushrooms (soak overnight, keep the soaking  water)
1/2 cup mushroom water (from soaking the shitakes)
2 cloves garlic, minced
1/2 teaspoon dried rosemary
1/2 teaspoon dried basil
1 brick, all-purpose cream
dash of red pepper flakes (optional)
salt and freshly ground black pepper, to taste
handful of fresh basil leaves, torn to pieces

Remove the chicken thighs from the brining liquid and drain, then pat dry with paper towels.

Sprinkle the chicken with salt and pepper, to taste. Get the salt and pepper under the skin as well. Take half of the smashed pieces of garlic and insert them under the skin of the chicken. The flavor of garlic will permeate throughout the chicken as it cooks.

Melt 1 Tbsp. butter in a large, non-stick skillet over medium high heat. Swirl in 1 Tbsp. olive oil to keep butter from burning. Put in the chicken, skin-side down, and sear both sides until golden brown, about 2-3 minutes per side.

Once browned, flip the chicken so they are skin side up. Lower the heat to medium-low and continue to cook, until the chicken has rendered some of their juices, about 10 minutes. Drain excess oil as necessary.

Push the cooked chicken pieces to one side of the skillet. Add the remaining 1 Tbsp butter in the skillet, add minced garlic and mushrooms. Sauté the mushrooms, stirring occasionally until tender and browned. Add in the rosemary and the basil, stir to mix. Pour in the cream and combine with the chicken and the mushroom sauté, making sure to coat the chicken pieces evenly with the sauce. Add the mushroom liquid and let the dish simmer over low heat until the cream has thickened, about 3-5 minutes. Mix well, then season with salt and pepper to taste. Sprinkle in the chili pepper flakes for some heat.

Remove from the stove and then scatter torn fresh basil leaves over the chicken prior to serving.

Patitas de Cerdo con Garbanzos

Tags

, , , , , ,

DSCF0068

Pork pata, that humble part of the pig has always been a favorite cut for me. I’ve grown up on my mom’s pork pata paksiw and pork pata nilaga with that rich, savory broth. One of the more underrated cuts, pork pata, when prepared well makes for a rustic, flavorful dish.

I was researching recipes for chick peas (garbanzos) when I came across this Puerto Rican dish, Patitas de Cerdo con Garbanzos. Patitas is technically pork feet (pig trotters) as opposed to our pata, that is mainly pork leg. It’s interesting how similar Puerto Rican dishes are to Filipino ones, it’s the Spanish influence that runs a culinary thread though our cultures. And this is how I knew the Patitas de Cerdo recipe will apply beautifully to pata as well.

After some tweaks, here is the recipe that I have come up with. The resulting dish was rich, gooey, and hearty. Puerto Ricans serve this with tostones (fried green plantain bananas), my Pinoy roots compel me to devour this with rice.

Ingredients:
4-6 pieces sliced pork pata (pork leg/feet)
handful of salt
olive oil
6-8 cups water
salt and fresh cracked pepper to taste
1 medium red onion cut into chunks
1 whole head garlic, roughly chopped
1 pork bouillon (optional)
2 cans chick peas or garbanzos, drained
1/2 cup tomato paste
1 cup diced stewed tomatoes
1 cup whole stewed tomatoes
1 red bell pepper, roasted and skin peeled off, diced
1 large potato skin on, cubed
a few fresh basil leaves, torn

Wash the pata slices well under running water. Drain, then rub a handful of salt all over the skin to clean thoroughly. Rinse well and pat dry with paper towels.

Heat up some olive oil in a pot and sear the pata slices on all sides until just browned. Add onions, garlic and 6-8 glasses of water to cover the pata. Let this come to a brisk boil, then set the heat to low and let simmer until the pata is tender, about 1.5 hours.

Meanwhile, roast the bell pepper over stove flame, using tongs. Once the skin is blackened all over, remove pepper from the fire and put in a covered bowl. Let it steam for a bit. When cool enough to handle, peel off the skin and wash off the rest of the black bits. Dice the roasted bell pepper, set aside.

When the pata is tender, add in the pork bouillon, salt and fresh cracked pepper to taste. Put in the potatoes. Add in the tomato paste and stir to mix. Pour in the diced and whole tomatoes and the roasted bell pepper. Let this simmer for at least 20 minutes.

Check that the potatoes are cooked. Add in the two cans of chick peas. Adjust the seasonings as needed. Let simmer for 10-15 minutes more, careful not to over-stir to keep the garbanzos whole.

Turn off the heat and toss in the torn basil leaves, stirring to incorporate. Transfer to a large serving bowl, spooning the chick peas over the pata slices. Drizzle some olive oil over the dish right before serving.

Bitter Melon Salad with Red Egg

Tags

, , , , ,

An acquired taste becomes a favorite over the years. Growing up, we’ve always been admonished at the dining table to “Eat your vegetables.” Over time, I have learned to consume my share of veggies not just to keep the peace, but because I’ve actually developed a love for veggie dishes.

After subsequent days of indulging in rich, fatty foods (a.k.a. joy!) my palate turns conscientious and begins to hanker for the clean, bitter-sour flavor of this dish. I learned to make bitter melon salad from watching our helpers prepare it countless times when I was growing up. I only made this myself when I moved away from home and had my own kitchen. The addition of the diced red egg evolved later on, probably an influence from my years living in Cebu, as the Ilonggo version of this is sans egg.

I find that this salad is best eaten after it’s been chilled for at least an hour in the fridge, with a side dish of grilled pork belly. I kid you not.

Ingredients:
1 fairly large bitter melon, halved lengthwise, cleaned, and sliced into thin half-moon pieces
1 red egg, chopped
handful of rock salt to rinse the bitter melon with
2 stalks scallions, diced
1 medium red onion, diced
1 large tomato, diced
pinch of chilli flakes
1/2 tsp. brown sugar
1/4 cup vinegar
dash of nam pla or light soy sauce
1 tsp. calamansi juice (2 calamansi)
salt, to taste
fresh cracked black pepper, to taste

Put sliced bitter melon in a colander. Add a small handful of rock salt and squeeze/rub into the bitter melon until some of the juice is expelled. Rinse, drain, and squeeze out excess water.

Combine bitter melon, tomatoes, onions, scallions, and red egg. Toss lightly to mix and transfer to a serving dish.

In another bowl, stir together chili flakes, brown sugar, vinegar, nam pla, calamansi juice, salt, and pepper. Pour over the salad and toss again to coat with the dressing.

Serve immediately or cool in the fridge an hour prior to serving.

Red-Braised Pork Belly

Tags

, , , , , ,

image

I confess, I am always attracted to a good-looking slab of pork belly. At the supermarket I will ask the guy behind the counter to hold up the slab for me so that I can scrutinize it from every angle. I look for a nice layering of meat and fat, as well as a fresh pinkness. The most attractive slab comes home with me.

For this recipe, choose a solid, thick slab of pork belly with meat and fat evenly matched. Use a belly cut that has been trimmed of ribs, the one that’s usually turned into bacon. The cloves and star anise will give it a savory, oriental flavor. The aroma of braising pork will fill your kitchen with a fantastic smell.

Ingredients:

1 kilo pork belly slab
Rock salt (for cleaning the belly)
4 large cloves of garlic
Thumb sized piece of ginger, thinly sliced into medallions
6 pcs. cloves
1 inch piece of cassia or cinnamon bark
2 pcs. star anise
Fresh cracked black pepper
Pinch of chilli flakes, to taste
2 Tbsps. Shiaoxing wine
1/2 cup light soy sauce
1/4 cup Kikkoman soy sauce
1 Tbsp. brown sugar
1 cup water
Cooking oil

Wash the pork belly well under running water. Take a handful of rock salt and rub it on the skin to slough off any impurities. Wash the pork belly again and then dry with paper towels, set aside.

In a large bowl, mix remaining ingredients except the water and cooking oil. Place the pork belly into the bowl and coat all sides with the marinade. Let the pork belly marinate for at least 30 minutes.

In a deep pot, heat up some cooking oil, just enough to sear the pork belly. Brown the pork belly on each side, turning over to make sure all sides are seared. Put the pork belly skin side up and then pour over the marinade and 1 cup of water. Turn up the heat to high until the liquid is briskly boiling, then turn to lowest setting. Cover the pot and let simmer for 2.5 hours.

Half way through the cooking, turn the pork over, skin side down. Make sure there is enough liquid remaining so that the pork is not scorched. In the last 5 minutes, turnover pork so that it is skin side up, braise with the remaining liquid. At this point, the pork will have turned red from the braising liquid, and the resulting sauce will be thick and syrupy.

Remove the braised pork belly and transfer to a serving plate, slice into half inch squares. Spoon over the remaining sauce.

Pork Steak, Re-imagined

Tags

, , ,

Image

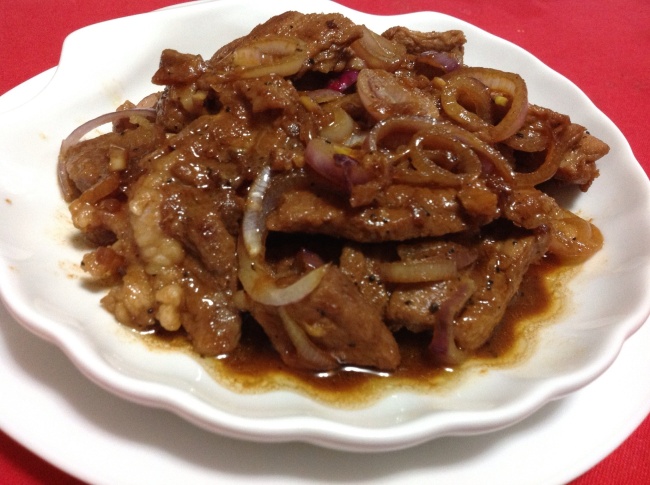
One of the things I like about living in a small city is that there’s always a wet market or a grocery nearby. So, say one weekday your ten year old foodie son suddenly wants pork steak or the oink equivalent of his favorite carne frita, you can step out in your shorts and tank top to purchase some pork. Our local meat shop sells thinly sliced pork steaks that they roll in neat bundles about the size of a fist. Three bundles come up to 500 grams or so, perfect portions for this dish. Hoisin sauce lends it a sweetish, anise-like flavor, and the soy sauce cuts thru the sweetness, keeping this dish savory.


Pork Steak in Soy-Hoisin Sauce

Ingredients:
500 grams pork steak or loin, sliced thinly
2-3 Tbsps. cooking oil
Fresh cracked black pepper
One large onion, sliced into rings
sesame oil

Marinade:
3 pcs. calamansi, cut in half crosswise
4 large cloves garlic, chopped
1 thumb-sized piece of ginger, cut into coins
1/2 tsp. coriander seeds, crushed
1 Tbsp. Hoisin sauce
1/2 cup light soy sauce
chili pepper flakes

In a large bowl, combine the juice of 3 calamansi with the chopped garlic, ginger, coriander seeds, Hoisin sauce, and light soy sauce. Add in the sliced pork and make sure to coat evenly with the mixture. Sprinkle with the chili flakes, let stand for at least 30 minutes.

Heat the cooking oil in a wok or deep frying pan. Put in the pork pieces, shaking off excess marinade into the bowl. Brown pork on both sides, swirling the pieces around the pan. Once pork is browned, add fresh cracked black pepper, then pour in the remaining marinade. Let the mixture come to a boil then turn the heat to low. Simmer for about 10 minutes or until the liquid has reduced to a sauce-like consistency.

Turn off heat, add in the onion rings, and toss to combine. Drizzle a little sesame oil over the dish just before serving.

Breakfast Egg Drop Soup with Mushroom

Tags

, , , , , ,

Egg drop soup

For those lazy mornings when I want something savory for breakfast but don’t want to eat rice with fried meats, this soup is a good alternative. The soup warms the tummy quickly, and since there’s no meat in this version of the dish, it’s a light breakfast. The egg is enough protein to jump start the day.

Egg Drop Soup with Shiitakes

3 small dried shiitake mushrooms, soaked in cold water until rehydrated
1/2 tsp. grated ginger
1 clove garlic, diced
Cooking oil
scallions, white stalks sliced thinly, green part chopped for garnish
2 cups chicken stock
1 tsp. cornstarch
1 tsp. light soy sauce
1 large egg, beaten
1/2 tsp. sesame oil
black pepper to taste

Remove mushrooms from soaking water, slice thinly. Put 1/2 cup of the mushroom water in a small bowl. Dissolve the cornstarch and light soy sauce in the water, set aside.

In a saucepan over high heat, sauté garlic, white part of the scallions, and ginger in oil until fragrant. Add the mushrooms, cook for a minute or so. Pour in chicken stock and bring to a boil. Add in the cornstarch mixture and stir until the soup thickens. Turn down heat to low. Pour in the beaten egg, stirring continuously to allow the egg to form ribbons in the soup. Add fresh cracked black pepper to taste.

Turn off heat. Ladle soup into bowls, drizzle sesame oil on top, and garnish with the chopped scallions.

Queso Español: Iberico

Tags

, , ,

Iberico cheese wedge

I was lucky to have made a short trip to the States this year, for a two week break to visit family and friends. One of the things I planned way before I stepped on the plane out of this dusty desert is to assemble a box to send to myself while I was there in the U.S. I was envisioning a box of goodies and supplies that I usually can’t get here. High up on the list is cheese. In Kabul I didn’t mind having to put on a 20-lb. bullet-proof vest just so I can go to the next camp to raid the Euro deli for cheese, ham, and salami. What, I am a girl that has specific foodie priorities.

My sister took me to a Trader Joe’s near her place in Baltimore, and they had a very good selection of cheeses. We went a little crazy and brought several kinds (Manchego, Parmigiano Reggiano, some soft cheeses) to munch with pita crackers, Parma ham slices, grapes, and a nice red Lambrusco. The civilized world indeed has a lot of enticements!

In one of the refrigerated cases was an Iberico wedge, recognizable by the hatched rind and well, the label. Manchego cheese is more common in the Philippines, and I usually go for this cheese alongside a deli meats platter. But the Iberico had a really nice creamy color, with a dreamy milky smell, and so I wanted to try it. My taste buds were happy that I did. Que rico! The Iberico was a revelation to me — with its rich, very buttery taste that goes well with strong flavored sausages. There is also a mild tartness to it, a counterpoint to the richness. I could munch on this cheese all day.

cheese-sausage-plate

I’ve since learned that Iberico cheese is made up of percentages of pasteurized milk from cows (50%), goats (30%), and sheep (10%). The remaining 10% could be water or other cheese components. Iberico is produced only in the province of Valladolid, in central Spain. It’s the sheep’s milk that delivers the buttery punch to this cheese. The Español typically serve it as a table cheese, so in deference I initially had my Iberico with pita crackers and slices of sopressata salami. As an experiment, I have since tried the Iberico nuked in the microwave as a melting cheese over bread, and it is delicious this way as well.

My drooling wish is to pair the Iberico’s creaminess with a glass (or two) of good red wine and paper-thin slices of jamon Serrano. That sounds like another trip, doesn’t it?

Kimchi Rice

Tags

, , , , ,

Kimchi rice

I liked kimchi at once, the first time I tasted it. Sure, the funky smell is a bit off-putting at first whiff, and the spice hit can be devastating to the tongue, but after a while you get used to all this. After a while you start craving it.

Kimchi is a palate cleanser, it provides counterpoint to savory dishes. I imagine in Korea they must use it in a lot of dishes. I always have a bottle or foil pouch of kimchi in the fridge. Even our house help have developed a liking for it, because we have kimchi on the table fairly often.

This kimchi rice recipe first came about after one particularly hung over early morning raid on the kitchen. It will surely wipe out the alcohol in your system.

Kimchi Rice

Ingredients:
2 cups pre-cooked rice (cold rice works well)
1 Tbsp. cooking oil
1/2 tsp. sesame oil
2 large garlic cloves, chopped
1/2 cup kimchi, roughly chopped
chili garlic sauce (optional)
fresh ground black pepper
dash or two of fish sauce (nam pla)
salt to taste

If working with newly-cooked rice, place it in the fridge for a few minutes. Cold rice works better in this recipe as it is not too mushy.

In a wok over medium high heat put in about 1 Tbsp of cooking oil. Swirl in the sesame oil. Add garlic and sauté until fragrant, but do not brown. Put in the chopped kimchi and stir-fry to combine. Add the chili garlic sauce and let boil briefly.

Put in the cooked rice and stir to mix with the kimchi. Add a dash or two of fish sauce, then salt and pepper to taste. You may omit the salt if desired.

Transfer to a serving dish. You can garnish this dish with a poached egg or some shredded nori.